Unveiling the Power of Carrier Bearing Pullers: A Comprehensive Guide
In the world of automotive maintenance, the carrier bearing puller stands out as a crucial tool for tackling driveline issues. This specialized equipment enables mechanics and home enthusiasts alike to efficiently remove and replace carrier bearings, ensuring smooth and safe vehicle operation.
Understanding Carrier Bearings: The Basics
Carrier bearings are essential components that support the driveshaft's rotation and reduce vibrations. They are typically located at the center of the driveshaft, providing stability and longevity to the driveline system.
Why Remove Carrier Bearings?
Carrier bearings may require removal for various reasons, including:
- Deterioration due to wear and tear
- Damage caused by accidents or road hazards
- Maintenance and replacement as part of a larger driveline overhaul
Types of Carrier Bearing Pullers
The automotive industry offers a variety of carrier bearing pullers designed to suit different vehicle makes and models. Common types include:
-
Hydraulic Pullers: Utilize hydraulic pressure to exert force and remove bearings
-
Mechanical Pullers: Employ leverage and mechanical advantage to dislodge bearings
-
Impact Pullers: Use a concentrated force to separate bearings from the driveshaft
Choosing the Right Puller for Your Vehicle
Selecting the appropriate carrier bearing puller for your vehicle is crucial. Consider the following factors:

-
Vehicle make and model: Different vehicles have varying bearing sizes and configurations
-
Bearing type: Some pullers are designed for specific bearing styles, such as roller or ball bearings
-
Driveshaft diameter: The puller must be compatible with the diameter of the driveshaft
-
Budget and availability: Pullers range in price and availability, so choose one that fits your needs
Safety Precautions
Working with carrier bearing pullers requires proper safety measures:
- Wear appropriate protective gear, including gloves and safety glasses
- Secure the vehicle on a stable surface using wheel chocks
- Use the puller according to manufacturer's instructions
- Avoid excessive force or sudden movements
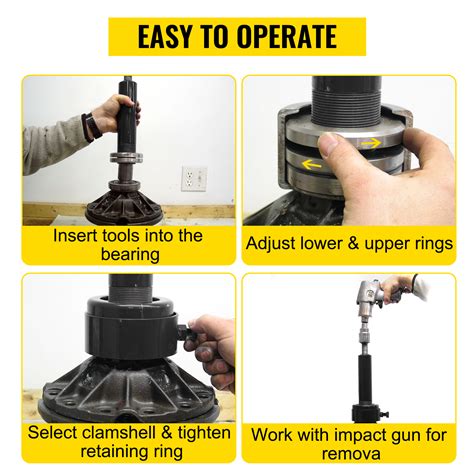
Step-by-Step Removal Process
-
Gather Tools and Materials: Ensure you have the proper carrier bearing puller, replacement bearing, and necessary tools
-
Identify Bearing Location: Locate the bearing on the driveshaft, usually in the center
-
Secure the Puller: Position the puller's jaws around the bearing and tighten securely
-
Apply Force: Use the puller's mechanism to gradually apply pressure until the bearing is separated from the driveshaft
-
Inspect and Replace: Once the bearing is removed, inspect the driveshaft and bearing surfaces for any damage. Install the new bearing as per manufacturer's specifications
Cost of Carrier Bearing Replacement
The cost of replacing a carrier bearing varies depending on factors such as vehicle make, model, and labor rates. On average, the cost ranges from $150 to $450, including parts and labor.
Benefits of Using a Carrier Bearing Puller
Using a carrier bearing puller offers several advantages:

-
Accurate Removal: Pullers provide precise force and leverage, ensuring the bearing is removed without damaging the driveshaft or surrounding components
-
Efficiency: Compared to manual methods, pullers significantly reduce the time and effort required for bearing removal
-
Safety: Pullers offer a controlled and safer method compared to hammering or prying, preventing injuries
-
Professional Results: Using a puller helps achieve a professional-grade removal, ensuring a smooth and reliable driveline system
Humorous Stories and Lessons Learned
-
The Stubborn Bearing: A mechanic encountered a bearing that stubbornly refused to budge. After several unsuccessful attempts with a puller, he discovered that the bearing was not seated correctly on the driveshaft. With proper alignment, the puller effortlessly removed the bearing.
-
Lesson: Proper alignment and technique are crucial for effective bearing removal.
-
The Unexpected Surprise: A do-it-yourselfer used a borrowed carrier bearing puller to remove a bearing. However, he applied excessive force, causing the puller to break and send the bearing flying across the garage.
-
Lesson: Follow the manufacturer's instructions and avoid using excessive force.
-
The Improvised Puller: A mechanic faced a unique situation where he had to replace a bearing but did not have a puller. He ingeniously fashioned a puller using a combination of bolts, washers, and a hydraulic jack. With some creativity, he successfully removed the bearing.
-
Lesson: Resourcefulness and creative thinking can solve unexpected challenges.
Tips and Tricks
-
Use a Lubricant: Applying a penetrating lubricant to the bearing's mating surfaces can ease the removal process
-
Protect Surrounding Components: Cover or protect nearby components, such as fuel lines or exhaust pipes, to avoid damage during the puller's operation
-
Proper Alignment: Ensure the puller is properly aligned with the bearing to prevent uneven or excessive force application
-
Inspect the Driveshaft: While removing the bearing, inspect the driveshaft for any signs of damage or wear, such as cracks or excessive rust
Effective Strategies for Carrier Bearing Removal
-
Choose the Right Puller: Select a puller that is compatible with the bearing size, type, and driveshaft diameter
-
Plan the Approach: Study the vehicle's driveline configuration and identify the best access point for the puller
-
Apply Controlled Force: Gradually apply force using the puller's mechanism, avoiding sudden or excessive movements
-
Monitor Progress: Regularly check if the bearing is separating from the driveshaft to prevent damage or excessive stress
-
Safety First: Use proper safety equipment and follow all safety guidelines
Call to Action
If you are facing issues with your vehicle's carrier bearing or require replacement, consulting a qualified mechanic is highly recommended. They will assess the situation, select the appropriate carrier bearing puller, and perform the replacement safely and efficiently. By adhering to best practices and following safety precautions, you can ensure a smooth and reliable driveline system for your vehicle.
Tables
Table 1: Carrier Bearing Puller Comparison
| Puller Type |
Advantages |
Disadvantages |
| Hydraulic |
High force, efficient |
Expensive, requires hydraulic pump |
| Mechanical |
Moderate force, easy to use |
Time-consuming, requires manual leverage |
| Impact |
Fast, concentrated force |
Can damage bearings if not used properly |
Table 2: Carrier Bearing Replacement Cost Breakdown
| Component |
Cost Range |
| Carrier Bearing |
$50-$150 |
| Puller Rental |
$50-$100 |
| Labor |
$100-$200 |
Table 3: Troubleshooting Carrier Bearing Wear
| Symptom |
Possible Cause |
Action |
| Vibrations |
Worn or damaged bearing |
Inspect and replace bearing |
| Noise |
Loose or misaligned bearing |
Adjust or replace bearing |
| Leaking Fluid |
Damaged bearing seal |
Replace bearing and seal |
Further Reading
- Automotive Carrier Bearing Replacement: https://www.autozone.com/repairguides/drivetrain-axle-and-output-shaft-repairs/replacing-a-carrier-bearing
