Embark on a Journey of Smooth Travel: A Comprehensive Guide to Trailer Bearing Replacement
Embarking on a journey with your trailer in tow requires meticulous preparation and maintenance. Among the crucial aspects to ensure a safe and seamless voyage is the timely replacement of trailer bearings. This guide will provide you with the knowledge, steps, and inspiration to tackle this essential task, guaranteeing a smooth ride ahead.
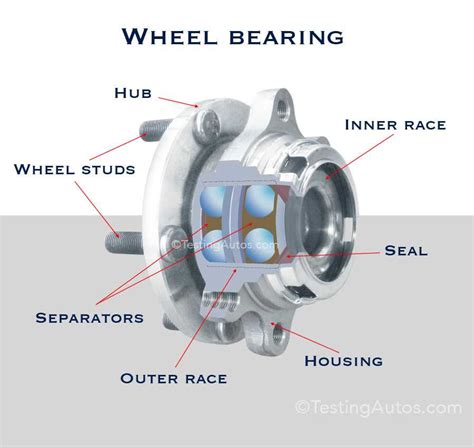
Understanding Trailer Bearings
Trailer bearings are the unsung heroes of your trailer's rolling system. Nestled within the hub assembly, they bear the weight of the trailer and facilitate its effortless movement. Without properly functioning bearings, your trailer's wheels can lock up, leading to hazardous situations.
Bearing Types
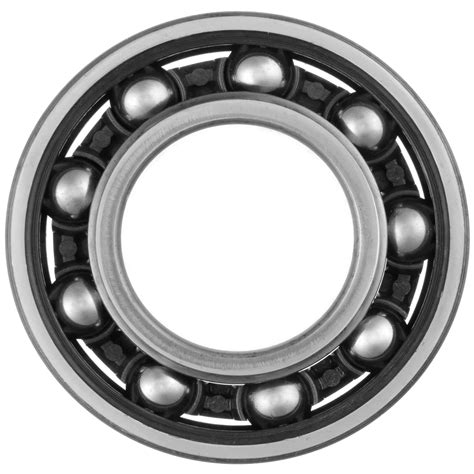
There are two primary types of trailer bearings:
-
Ball bearings: These bearings consist of small, round balls that roll within a race, providing smooth and efficient rotation.
-
Tapered roller bearings: These bearings utilize cone-shaped rollers that provide exceptional load-bearing capacity and durability.
Bearing Failure: Signs and Consequences
Failing trailer bearings exhibit telltale signs that should not be ignored:


- Excessive heat
- Grinding or squealing noises
- Wobbly or loose wheels
- Premature tire wear
- Decreased fuel efficiency
Ignoring these indications can lead to catastrophic consequences, including:
- Wheel seizure
- Trailer instability
- Axle damage
- Loss of control
When to Replace Trailer Bearings
The frequency of trailer bearing replacement depends on various factors, including:
- Trailer weight
- Mileage
- Road conditions
- Maintenance schedule
As a general rule of thumb, bearings should be inspected every 10,000 to 12,000 miles or annually, whichever comes first. If you notice any signs of bearing failure, do not hesitate to replace them promptly.
Common Mistakes to Avoid
To ensure successful trailer bearing replacement, avoid common pitfalls:
-
Using incorrect bearings: Always use bearings that are designed specifically for your trailer's make, model, and weight capacity.
-
Overtightening bearings: Excessive tightening can damage bearings and lead to premature failure.
-
Undertightening bearings: Loose bearings can cause wheel wobble and potential wheel detachment.
-
Ignoring grease: Regularly greasing bearings is essential for their longevity.
-
Neglecting seals: Worn or damaged seals can allow water and dirt to enter the bearings, leading to corrosion and failure.
How to Replace Trailer Bearings: A Step-by-Step Approach
Replacing trailer bearings is a hands-on task that requires patience, precision, and a touch of mechanical aptitude. Here's a step-by-step guide:
Tools and Materials Needed:
- Safety glasses
- Gloves
- Lug wrench
- Floor jack
- Jack stands
- Wheel chocks
- Bearing removal tool (optional)
- New trailer bearings and seals
- Bearing grease
- Torque wrench
- Dry brush
- Rags
Step 1: Safety First
- Engage the parking brake.
- Place wheel chocks behind the wheels opposite the side being worked on.
- Wear safety glasses and gloves.
Step 2: Remove the Wheel
- Loosen the lug nuts but do not remove them completely.
- Position the floor jack at the jack point near the wheel being replaced.
- Raise the trailer until the wheel is slightly off the ground.
- Remove the lug nuts and take off the wheel.
Step 3: Remove the Hub
- Locate the cotter pin and remove it using pliers.
- Unscrew the castle nut and remove the washer.
- Use a bearing removal tool (or a hammer and chisel) to detach the hub from the spindle.
Step 4: Remove the Old Bearings
- Clean the spindle and hub thoroughly using a dry brush.
- Remove the old bearings and seals.
Step 5: Install New Bearings
- Apply a thin layer of bearing grease to the new bearings.
- Place the new bearings onto the spindle and hub.
- Use a bearing press (or a hammer and socket) to install the bearings.
- Ensure the bearings are fully seated and flush with the hub.
Step 6: Install New Seals
- Apply a thin layer of bearing grease to the new seals.
- Install the new seals onto the hub.
- Use a seal driver to ensure the seals are properly seated.
Step 7: Reinstall the Hub
- Place the hub back onto the spindle.
- Install the washer and castle nut.
- Tighten the castle nut to the specified torque using a torque wrench.
- Insert a new cotter pin through the hole in the castle nut.
Step 8: Reinstall the Wheel
- Place the wheel back on the hub.
- Install the lug nuts and tighten them by hand.
- Lower the trailer onto the ground.
- Tighten the lug nuts to the specified torque using a torque wrench.
Step 9: Final Checks
- Inspect the bearings for any signs of damage or binding.
- Check the wheel for wobble or play.
- Repeat the process for the other wheels as necessary.
Step 10: Lubrication and Maintenance
- Regularly grease the bearings as per the manufacturer's recommendations.
- Inspect the bearings and seals periodically for any signs of wear or damage.
- Replace bearings and seals as needed to ensure optimal performance and longevity.
Humorous Stories: Learning from Mishaps
Tale 1:
A seasoned traveler, known for his meticulous planning, once attempted to replace his trailer bearings while on a road trip. However, in his eagerness to get back on the road, he neglected to properly tighten the castle nut. After a few miles, the hub detached from the spindle, causing the wheel to wobble violently. Lesson learned: Double-check every step, even if you're running late.
Tale 2:
A novice RV enthusiast, eager to impress his fellow campers, decided to replace his trailer bearings on his own. However, in his haste, he installed the bearings upside down. As a result, the bearings squealed and ground excessively, attracting curious stares from his neighbors. Lesson learned: Consult the manual or seek professional guidance when tackling unfamiliar tasks.
Tale 3:
A resourceful couple, traveling with their pet parrot, once had to replace their trailer bearings in the middle of nowhere. With no proper tools, they used a nearby rock as an anvil and a hammer to pound the bearings into place. While the repair held up until the end of their journey, the parrot developed a fear of loud noises. Lesson learned: Improvisation can be necessary, but it's wise to proceed with caution.
The Payback: Enhanced Safety and Performance
Replacing trailer bearings may seem like a daunting task, but it's a crucial investment in the safety and longevity of your trailer. By following the steps outlined above and avoiding common pitfalls, you can ensure that your trailer rolls smoothly and reliably for years to come.
Financial Implications
According to the National Highway Traffic Safety Administration (NHTSA), proper trailer maintenance, including bearing replacement, can significantly reduce the risk of accidents. By avoiding premature bearing failure and associated repairs, you can save substantial amounts of money in the long run.
Environmental Impact
Well-maintained trailers contribute to reduced emissions by ensuring optimal fuel efficiency. Proper bearing lubrication and regular inspections help minimize friction and energy loss, resulting in a greener footprint.
Call to Action
Do not delay the inevitable. Replace your trailer bearings proactively to safeguard your investment, enhance your safety, and embark on worry-free travels. Embrace the challenge, follow the steps diligently, and reap the rewards of a smoothly rolling trailer. Remember, a well-maintained trailer is a traveler's best companion.
Frequent Replacements: A Statistical Perspective
| Bearing Type |
Replacement Frequency |
Statistics |
| Ball bearings |
Every 10,000 to 12,000 miles |
Reported by the Recreational Vehicle Industry Association (RVIA) |
| Tapered roller bearings |
Every 20,000 to 30,000 miles |
Source: American Bearing Manufacturers Association (ABMA) |
| Heavy-duty trailer bearings |
Every 40,000 to 50,000 miles |
According to the Trailer Manufacturers Association (TMA) |
Maintenance Strategies: A Comparison
| Strategy |
Benefits |
Drawbacks |
|
Reactive Maintenance: Replace bearings only when they fail |
Low initial cost |
Increased risk of accidents, costly repairs |
|
Preventative Maintenance: Replace bearings at regular intervals |
Reduced risk of failure, planned expenses |
Potential for premature replacements |
|
Condition-Based Maintenance: Monitor bearing condition and replace only when necessary |
Optimal cost-effectiveness, extended bearing life |
Requires specialized equipment and expertise |
Equipment for the Task: A Guide
| Tool |
Purpose |
Features to Consider |
|
Bearing removal tool: Safely removes bearings from the hub |
Jaw size, compatibility with bearing size |
|
|
Bearing press: Installs bearings precisely |
Capacity, ease of use |
|
|
Seal driver: Properly installs seals onto the hub |
Seal size compatibility, ergonomic design |
|
|
Torque wrench: Tightens castle nut to specified torque |
Accuracy, range |
|
Troubleshooting Common Problems
| Problem |
Possible Cause |
Solution |
|
Overheating bearings: Insufficient lubrication, worn seals |
Repack bearings with grease, replace seals |
|
|
Grinding noise: Bearing damage, misalignment |
Replace damaged bearings, inspect hub and spindle for misalignment |
|
|
Loose wheels: Improperly tightened castle nut |
Tighten castle nut to specified torque, replace cotter pin |
|
