The Ultimate Guide to Clevis Pins: Unlocking the Power of Secure Connections
Introduction
In the realm of mechanical engineering, clevis pins stand out as indispensable components that ensure the secure and reliable connection of various assemblies. This guide will delve deep into the world of clevis pins, exploring their intricacies, applications, and best practices for their use.
Chapter 1: Understanding Clevis Pins
1.1 Definition and Types
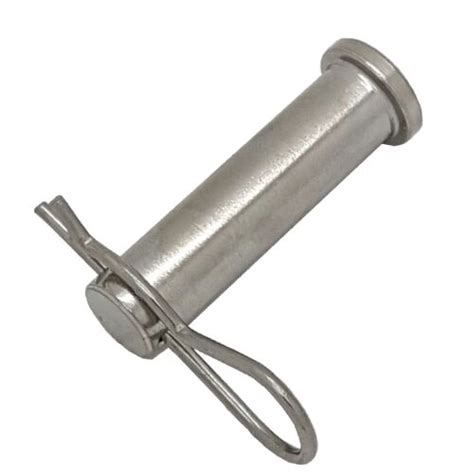
A clevis pin is a cylindrical rod with a U-shaped head at one end and a cotter pin hole at the other. They are typically used to connect two components together, with the U-head fitting into a clevis on one piece and the cotter pin passing through both pieces to secure the connection.
Clevis pins come in various types, including:
-
Standard Clevis Pins: The most common type, with a straight shank and a standard cotter pin hole.
-
Self-Locking Clevis Pins: Equipped with a locking mechanism that prevents accidental loosening.
-
Heavy-Duty Clevis Pins: Designed for demanding applications, with a thicker shank and stronger materials.
1.2 Materials and Coatings
Clevis pins are typically made from high-strength materials such as steel, stainless steel, or alloy steel. To enhance their durability and corrosion resistance, they may be coated with zinc, cadmium, or other surface treatments.

Chapter 2: Applications of Clevis Pins
2.1 Industrial Machinery
Clevis pins find widespread use in industrial machinery, connecting components such as shafts, levers, and gears. They ensure reliable operation and prevent accidental disconnections.
2.2 Automotive Industry
In the automotive sector, clevis pins are used in suspension systems, steering linkages, and brake components. They provide a secure and easily adjustable connection between various parts.
2.3 Aerospace Engineering
The aerospace industry relies heavily on clevis pins due to their ability to withstand extreme loads and environments. They are used in aircraft control systems, landing gear, and other critical applications.
Chapter 3: Best Practices for Clevis Pin Selection and Use
3.1 Choosing the Right Clevis Pin

Selecting the appropriate clevis pin for an application requires considering several factors:
-
Load Capacity: Determine the maximum load that the pin will experience.
-
Materials: Choose materials that can withstand the operating conditions and environment.
-
Corrosion Resistance: Select coatings or materials that provide sufficient protection against corrosion.
3.2 Proper Installation
To ensure a secure connection, it is crucial to follow these steps:
-
Insert the Pin: Align the clevis pin with the clevis hole and insert it fully.
-
Secure the Pin: Pass the cotter pin through the hole and bend its ends to prevent it from slipping out.
-
Tighten the Pin: Use a castle nut or other locking mechanism to tighten the pin and prevent accidental loosening.
Chapter 4: Troubleshooting Clevis Pin Related Issues
4.1 Loose Clevis Pins
If a clevis pin becomes loose, it can lead to connection failures. Check for worn or damaged cotter pins, bent or broken clevises, or excessive vibration.
4.2 Corrosion
Corrosion can weaken clevis pins and compromise their integrity. Inspect for rust, pitting, or discoloration. If corrosion is present, consider replacing the pin or applying a protective coating.
4.3 Pin Failure
Clevis pins can fail due to overloading, improper installation, or material fatigue. If a pin fails, it is crucial to immediately identify and replace it.
Chapter 5: Stories and Lessons Learned
5.1 The Catastrophic Clevis Pin Failure
In 2014, a crane accident in New York City was caused by a clevis pin failure. One of the clevises connecting the boom to the tower failed under excessive load, resulting in the collapse of the crane and the tragic death of an operator. This incident highlights the importance of proper clevis pin selection and maintenance.
5.2 The Triumph of Redundancy
In a critical aircraft application, a double-clevis pin design was employed to enhance safety. If one clevis pin failed, the backup clevis pin would prevent a catastrophic failure. This redundant design demonstrates the effectiveness of incorporating multiple layers of protection in safety-critical applications.
5.3 The Value of Inspection
A regular inspection program at a manufacturing plant identified a loose clevis pin in a conveyor system. By replacing the cotter pin and tightening the clevis, a potential accident was averted. This incident emphasizes the importance of proactive maintenance and the cost-effectiveness of preventing failures.
Chapter 6: Effective Strategies for Clevis Pin Management
6.1 Inventory Management
Maintain a well-stocked inventory of clevis pins in various sizes and materials to avoid delays and downtime.
6.2 Regular Inspections
Establish a routine inspection schedule to identify and address any potential issues with clevis pins early on.
6.3 Preventive Maintenance
Implement a preventive maintenance program that includes periodic replacement of clevis pins based on usage and operating conditions.
Chapter 7: Step-by-Step Approach to Using Clevis Pins
7.1 Step 1: Determine Requirements
Identify the load capacity, materials, and corrosion resistance requirements for the application.
7.2 Step 2: Select the Clevis Pin
Choose the appropriate clevis pin based on the determined requirements.
7.3 Step 3: Install the Pin
Insert the pin into the clevis and secure it with a cotter pin.
7.4 Step 4: Tighten the Pin
Use a castle nut or other locking mechanism to tighten the pin and prevent accidental loosening.
7.5 Step 5: Inspect and Monitor Regularly
Perform regular inspections and monitor the condition of the clevis pin to ensure its integrity.
Chapter 8: Pros and Cons of Clevis Pins
8.1 Pros
- Easy to install and remove
- Versatile and can be used in various applications
- Cost-effective and widely available
- Can be easily replaced when worn or damaged
8.2 Cons
- Can be susceptible to corrosion if not properly coated
- Can loosen if not properly secured
- May not be suitable for extremely high load applications
- Require periodic inspection and maintenance
Conclusion
Clevis pins are essential mechanical components that play a vital role in connecting various assemblies securely. By understanding their types, applications, best practices, and troubleshooting techniques, engineers and technicians can ensure the safe and reliable operation of machinery and equipment. Whether it's preventing catastrophic failures, enhancing redundancy, or implementing effective management strategies, this comprehensive guide provides the knowledge and insights necessary to unlock the full potential of clevis pins.
Tables
Table 1: Clevis Pin Load Capacities
| Pin Diameter (in) |
Static Load Capacity (lbs) |
Dynamic Load Capacity (lbs) |
| 1/4 |
2,000 |
1,200 |
| 5/16 |
4,000 |
2,400 |
| 3/8 |
6,000 |
3,600 |
| 1/2 |
10,000 |
6,000 |
| 5/8 |
15,000 |
9,000 |
Table 2: Clevis Pin Materials and Coatings
| Material |
Advantages |
Disadvantages |
| Steel |
High strength, low cost |
Susceptible to corrosion |
| Stainless Steel |
High strength, corrosion resistance |
Expensive |
| Alloy Steel |
High strength and toughness |
More expensive than steel |
| Zinc Coating |
Good corrosion resistance |
Thin and can wear off |
| Cadmium Coating |
Excellent corrosion resistance |
Toxic and environmentally hazardous |
Table 3: Effective Strategies for Clevis Pin Management
| Strategy |
Description |
| Inventory Management |
Maintain adequate stock levels to prevent shortages. |
| Regular Inspections |
Conduct routine inspections to identify and address any issues early on. |
| Preventive Maintenance |
Establish a schedule for periodic replacement of clevis pins based on usage and operating conditions. |
| Training |
Provide training to employees on the proper installation, removal, and inspection of clevis pins. |
| Quality Control |
Implement quality control processes to ensure that only high-quality clevis pins are used. |
