Drum Bearing: The Heartbeat of Your Dryer
Dryer drum bearings play a critical role in the smooth operation of your laundry appliance. These essential components support the rotating drum, allowing it to spin freely and efficiently dry your clothes. Neglecting the health of your dryer's drum bearings can lead to costly repairs and premature breakdowns.
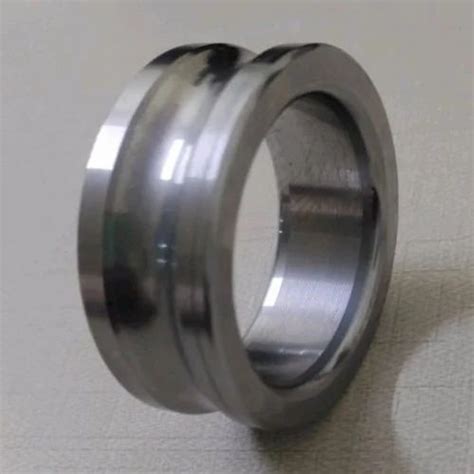
The Anatomy of a Dryer Drum Bearing
A dryer drum bearing consists of several key elements:
-
Inner Race: A hardened steel ring that fits snugly around the shaft that supports the drum.
-
Outer Race: A larger, stationary ring that is mounted to the dryer frame and provides support for the inner race.
-
Rolling Elements: Small, cylindrical or spherical balls or rollers that circulate between the inner and outer races, reducing friction and facilitating smooth rotation.
-
Cage: A retainer that keeps the rolling elements in place and prevents them from colliding with each other.
Importance of Drum Bearings
Drum bearings are crucial for the proper functioning of your dryer for several reasons:

-
Smooth Rotation: Bearings ensure that the drum rotates smoothly and effortlessly, minimizing noise and vibration during operation.
-
Extended Appliance Life: Properly maintained bearings prevent excessive wear and tear on the drum and other dryer components, extending the appliance's lifespan.
-
Energy Efficiency: Bearings reduce friction, allowing the drum to rotate with less resistance, which translates into energy savings.
-
Safety: Worn or damaged bearings can cause the drum to wobble or lock up, posing a safety hazard.
Signs of a Failing Drum Bearing
Several telltale signs indicate that your dryer's drum bearings may be failing:
-
Screeching or Grinding Noises: As the bearings wear out, they can produce a high-pitched screeching or grinding sound during operation.
-
Drum Wobble: A noticeable wobble or shaking of the drum during spinning is a common symptom of failing bearings.
-
Increased Vibration: Excessive vibration during the drying cycle can indicate damaged or worn bearings.
-
Extended Drying Time: If your clothes are taking longer than usual to dry, it could suggest that the bearings are causing friction and slowing down the drum's rotation.
-
Burning Smell: In severe cases, failing bearings may generate heat and emit a burning odor.
Causes of Drum Bearing Failure
Drum bearing failure can be attributed to several factors:

-
Overloading: Regularly overloading the dryer with excessive laundry can put undue strain on the bearings, leading to premature wear.
-
Lack of Maintenance: Neglecting to clean and lubricate the bearings can cause dirt and debris to accumulate, resulting in corrosion and reduced performance.
-
Age and Wear: As dryers age, the bearings naturally wear out due to constant use and friction.
-
Improper Installation: Improper installation of the dryer or its components can also contribute to bearing failure.
DIY Drum Bearing Replacement
Replacing drum bearings is a complex task that requires technical expertise and special tools. However, for those with the necessary skills and knowledge, the following steps provide a general overview of the process:
-
Safety First: Unplug the dryer and disconnect the gas or electrical supply.
-
Remove Housing: Open the dryer's cabinet and remove the housing panels to expose the drum and bearing assembly.
-
Detach Drum: Carefully lift the drum off the shaft and detach it from the unit.
-
Replace Bearings: Extract the old bearings from the drum and install new ones using a bearing puller and installer.
-
Clean and Lubricate: Clean the bearing area and apply a high-temperature grease to the new bearings.
-
Reassemble: Reassemble the drum and housing in reverse order.
-
Test Run: Plug in the dryer and run a test cycle to ensure proper operation.
Precautions:
- Always consult a qualified appliance repair technician if you are unsure about any step in the replacement process.
- Use high-quality, manufacturer-recommended bearings for optimal performance and durability.
- Follow all manufacturer's instructions carefully to avoid voiding your warranty or causing further damage.
Maintenance Tips for Drum Bearings
Regular maintenance is essential to extend the life of your dryer's drum bearings:
-
Clean Regularly: Use a vacuum cleaner to remove lint and debris from the bearing area periodically.
-
Lubricate: Apply a high-temperature grease to the bearings every 6-12 months or as recommended by the manufacturer.
-
Moderate Loads: Avoid overloading the dryer to minimize strain on the bearings.
-
Professional Service: Consider having your dryer serviced by a qualified technician every few years for thorough cleaning and inspection of the bearings.
Drum Bearing Types
Drum bearings come in various types, each with its characteristics:

| Bearing Type |
Features |
Advantages |
Disadvantages |
| Ball Bearing |
Spherical rolling elements |
Low friction, high speed |
Limited axial load capacity |
| Roller Bearing |
Cylindrical rolling elements |
High load capacity, less friction |
Noisier than ball bearings |
| Seal Master Bearing |
Sealed ball bearing with built-in seal |
Protection against moisture and debris |
Can be more expensive |
Interesting Stories about Drum Bearings
-
The Laundry Fairy: Once upon a time, a woman had a dryer that made an unbearable screeching noise. She ignored the problem for several months, thinking it was just a "quirk" of the appliance. One night, after a particularly noisy drying cycle, she went to bed feeling frustrated. Imagine her surprise when she woke up in the morning to find her laundry perfectly dried and the dryer completely silent. Confused, she checked the bearing, only to discover that it had mysteriously repaired itself overnight, leaving her with the legend of the "Laundry Fairy."
-
The Dancing Appliance: A man had a dryer that would start "dancing" vigorously during the drying cycle, causing it to shake uncontrollably. He called an appliance repair technician, who arrived with a puzzled expression. After thorough inspection, the technician found that the drum bearing had become misaligned during installation, causing the drum to wobble excessively. With a few adjustments, the "dancing appliance" was restored to its steady, quiet operation, amusing the technician with its previous antics.
-
The Silent Saboteur: A woman's dryer had been running flawlessly for years, but suddenly it started making a faint grinding noise. She dismissed it as a minor annoyance, but after a few weeks, the noise became unbearable. Upon closer examination, she discovered that the drum bearing had worn out, causing the drum to rub against its housing. In the end, the "silent saboteur" had cost her both peace of mind and a significant repair bill.
Lesson Learned:
These humorous stories underscore the importance of paying attention to even minor problems with your dryer's drum bearings. Ignoring these signs can lead to more severe issues, costly repairs, and reduced appliance efficiency.
3 Interesting Facts about Drum Bearings
- Drum bearings account for approximately 80% of dryer breakdowns.
- The average lifespan of a drum bearing is between 5-8 years, depending on usage and maintenance.
- Using dryer sheets can contribute to drum bearing failure by leaving a residue that attracts lint and debris.
FAQs about Drum Bearings
Q1: Can I replace the drum bearings myself?
A1: While it is possible to replace drum bearings yourself, it requires technical expertise and special tools. If you are not comfortable performing this repair, it is advisable to seek professional assistance.
Q2: How often should I lubricate the drum bearings?
A2: Lubricate the drum bearings every 6-12 months or as recommended by the manufacturer. Using high-temperature grease designed specifically for dryer bearings is crucial.
Q3: What are the signs of worn-out drum bearings?
A3: Screeching or grinding noises, drum wobble, increased vibration, extended drying time, and a burning smell are all potential indicators of worn-out drum bearings.
Q4: Can overloading the dryer damage the drum bearings?
A4: Yes, overloading the dryer can put excessive strain on the drum bearings, leading to premature wear and failure.
Q5: How much does it cost to replace drum bearings?
A5: The cost of replacing drum bearings varies depending on the type of dryer, the availability of parts, and labor rates. On average, the cost can range from $150 to $400, including parts and labor.
Q6: How long does it take to replace drum bearings?
A6: Replacing drum bearings typically takes between 2-4 hours, depending on the complexity of the repair and the technician's experience.
Call to Action
If you suspect that your dryer's drum bearings are failing, do not hesitate to take action. Ignoring the problem can lead to further damage, reduced dryer efficiency, and costly repairs. Contact a qualified appliance repair technician to diagnose the issue and perform the necessary repairs promptly. With proper maintenance and care, your dryer's drum bearings will continue to support smooth operation and extend the life of your appliance for many years to come.
