The Comprehensive Guide to Soldering Stainless Steel: A Step-by-Step Approach with Tips and Strategies
Stainless steel is a highly versatile alloy prized for its exceptional corrosion resistance, durability, and strength. Its applications span various industries, including culinary, construction, automotive, and aerospace. However, soldering stainless steel presents unique challenges due to its high chromium content, which forms a protective oxide layer on its surface.
This comprehensive guide will equip you with the knowledge and skills necessary to solder stainless steel effectively. We will cover the fundamentals, strategies, step-by-step instructions, and tips to help you achieve high-quality solder joints.
Understanding Stainless Steel
Stainless steel is an iron-chromium alloy containing a minimum of 10.5% chromium. This chromium content forms a thin, invisible oxide layer on the metal's surface, which protects it from corrosion and rust.
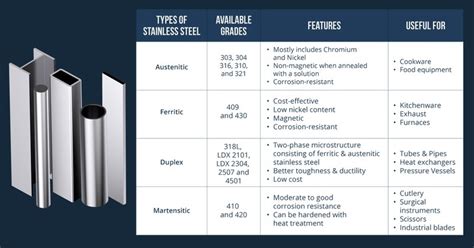
Types of Stainless Steel:

There are various types of stainless steel, each with distinct properties and applications. The most common types include:
-
Austenitic: (e.g., 304, 316) Non-magnetic, corrosion-resistant, and suitable for welding and bending.
-
Ferritic: (e.g., 430) Magnetic, less corrosion-resistant than austenitic, but stronger and more wear-resistant.
-
Martensitic: (e.g., 410) Magnetic, hardenable, and wear-resistant, but less corrosion-resistant than austenitic and ferritic types.
Challenges in Soldering Stainless Steel
Soldering stainless steel poses several challenges due to its protective oxide layer:
-
High melting point: The oxide layer's melting point is higher than the melting point of solder.
-
Formation of chromium carbides: High soldering temperatures can lead to the formation of brittle chromium carbides, weakening the joint.
-
Oxidation: The oxide layer can prevent the solder from bonding to the metal.
Strategies for Effective Soldering
To overcome these challenges, employ the following effective strategies:

-
Use a suitable solder: Select a solder with a melting point below the melting point of the oxide layer and compatible with stainless steel.
-
Prepare the surface: Thoroughly clean the surfaces to be soldered to remove dirt, oil, and oxides. Use a flux specifically designed for stainless steel to dissolve the oxide layer.
-
Apply flux: Apply a generous amount of flux to the surfaces to promote solder flow and prevent oxidation.
-
Use a heat sink: A heat sink helps dissipate heat away from the soldering area, preventing the formation of chromium carbides.
-
Control the temperature: Monitor the temperature during soldering to avoid overheating and damaging the metal.
Step-by-Step Soldering Process
Follow these steps for successful soldering of stainless steel:
-
Clean and prepare the surfaces: Use a degreaser or solvent to remove any dirt or oil from the metal surfaces. Sand or abrade the surfaces to provide a fresh, oxide-free surface.
-
Apply flux: Apply a flux specifically designed for stainless steel to the surfaces to be soldered. The flux will help dissolve the oxide layer.
-
Position the components: Place the components to be soldered in the desired position. Use clamps or fixtures to hold them securely.
-
Apply solder: Use a soldering iron or torch to apply solder to the joint. Use a sufficient amount to fill the gap between the components.
-
Heat the joint: Heat the joint until the solder melts and flows into place. Avoid overheating to prevent damage to the metal.
-
Cool the joint: Allow the joint to cool slowly to allow the solder to solidify and form a strong bond.
-
Clean the joint: Remove any excess flux or solder from the joint using a damp cloth or flux remover.
Tips and Tricks
- Use a flux with a high acid content to effectively dissolve the oxide layer.
- Apply flux liberally to ensure complete coverage of the surfaces to be soldered.
- Use a soldering iron with a high-wattage tip to provide sufficient heat for melting the oxide layer.
- Hold the soldering iron tip perpendicular to the joint to minimize heat loss.
- Allow the flux to cool completely before handling to prevent damage to the joint.
Pros and Cons of Soldering Stainless Steel
Pros:
-
Corrosion resistance: Soldered stainless steel joints retain the excellent corrosion resistance of the base metal.
-
Durability: Soldering creates strong, durable joints capable of withstanding various environmental conditions.
-
Electrical conductivity: Soldering can provide good electrical conductivity between the components.
Cons:
-
Difficulty: Soldering stainless steel can be more challenging than soldering other metals due to its high melting point and oxide layer.
-
Heat damage: Overheating during soldering can damage the metal and weaken the joint.
-
Chromium carbide formation: High temperatures can cause the formation of brittle chromium carbides, reducing the joint's strength.
Effective Soldering Strategies
- Choose the appropriate flux:
-
Liquid Flux: Provides a strong bond and protects the joint from oxidation.
-
Paste Flux: Ideal for vertical surfaces and provides a controlled application.
- Use a high-temperature solder:
-
Lead-Based Solder: 60/40 lead-tin solder melts at 361°F, ensuring a strong bond.
-
Lead-Free Solder: Available in various melting points, choose one compatible with stainless steel.
- Control the soldering temperature:
-
Soldering Iron: Use a soldering iron with a temperature between 650°F and 750°F.
-
Torch: A butane or propane torch provides a more controlled heat source.
- Avoid overheating:
-
Heat Sink: Use a heat sink to absorb excess heat and prevent damage to the metal.
-
Thermal Paste: Apply thermal paste to dissipate heat away from sensitive components.
Tips and Tricks for Successful Soldering
-
Use a bright-tipped soldering iron: This ensures optimal heat transfer for faster and more efficient soldering.
-
Tin the soldering tip regularly: A properly tinned tip promotes even heat distribution and prevents the solder from sticking.
-
Apply flux to the solder joint: Flux helps remove oxides, facilitates solder flow, and strengthens the bond.
-
Hold the soldering iron at a 45-degree angle: This allows the solder to flow easily onto the joint.
-
Avoid excessive force: Applying too much pressure can damage the solder joint or melt the underlying metal.
-
Allow the solder joint to cool slowly: This helps strengthen the bond and prevent cracking.
Common Errors and How to Avoid Them
-
Insufficient flux: This can lead to poor solder flow and a weak joint.
-
Overheating: Causes oxidation, damage to the metal, and weak bonds.
-
Cold solder joint: Occurs when the solder does not melt properly, resulting in a brittle and unreliable connection.
-
Bridging: When solder flows between adjacent components, creating unintentional connections.
To avoid these errors:
- Ensure adequate flux application.
- Control the soldering temperature and avoid overheating.
- Preheat the joint before soldering.
- Use the proper solder for the application.
Applications of Soldering Stainless Steel
Soldering stainless steel finds applications in various industries, including:
-
Medical devices: Surgical instruments, implants, and diagnostic equipment.
-
Electronics: Printed circuit boards, connectors, and electronic enclosures.
-
Automotive: Fuel lines, exhaust systems, and engine components.
-
Aerospace: Aircraft components, fuel tanks, and engine parts.
-
Food processing: Kitchen equipment, utensils, and conveyor systems.
Conclusion
Soldering stainless steel requires careful attention to detail, proper techniques, and effective strategies. By understanding the challenges associated with soldering this unique alloy, selecting the appropriate materials and techniques, and following the step-by-step approach outlined in this guide, you can achieve high-quality, reliable solder joints. Remember to employ the tips and tricks provided to improve your soldering skills and ensure successful results.
